

Wall shelves are more than just storage; they are a way to add style, personality, and functionality to any room. Whether you live in a small apartment or a spacious home, wall shelves help you organize essentials while showcasing your creativity. The best part? You don’t need to spend a fortune. With simple materials and a little effort, you can create stunning DIY wall shelves. Here are 10 DIY wall shelf ideas simple enough for anyone to try.
1. Floating Wooden Shelves
Floating shelves are a modern favorite because of their minimalistic look. These shelves appear to “float” on the wall without visible brackets.
Materials Needed:
- Wooden planks
- Wall anchors
- Screws
- Level
DIY Steps:
- Measure and mark the wall where you want the shelf.
- Drill holes and insert wall anchors.
- Attach the bracket and slide the wooden plank on top.
- Secure the plank with screws, and your floating shelf is ready.
Why It Works:
Floating shelves are perfect for living rooms, bedrooms, and kitchens. They give a clean look and are easy to style with plants, books, or photo frames.

2. Ladder Shelves
A ladder shelf is a freestanding option that leans against the wall. It’s ideal if you want to avoid drilling holes.
Materials Needed:
- Wooden ladder or planks
- Wood glue
- Sandpaper
- Paint (optional)
DIY Steps:
- Sand the ladder for a smooth finish.
- Paint or stain it according to your room’s decor.
- Place planks on the steps to act as shelves.
- Lean it against the wall.
Why It Works:
Ladder shelves are versatile and can be moved easily. They are perfect for displaying books, decor items, or kitchen supplies.

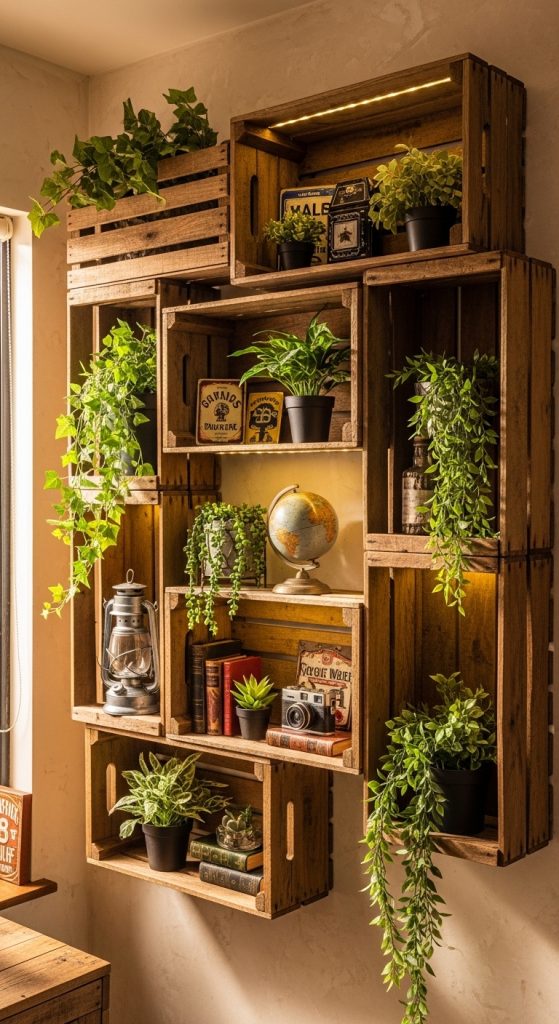
3. Crate Wall Shelves
Repurposed wooden crates can be transformed into rustic wall shelves. They are budget-friendly and add a vintage touch.
Materials Needed:
- Wooden crates
- Screws and wall anchors
- Paint or stain
DIY Steps:
- Paint or stain the crates.
- Mount the crates on the wall using screws and anchors.
- Arrange multiple crates in a grid or staggered pattern.
Why It Works:
Crate shelves are excellent for displaying collectibles, small plants, or toys. They add character and charm to any room.
4. Corner Shelves
Corner shelves maximize unused space and are perfect for small rooms. They can be simple triangular shelves or custom designs.
Materials Needed:
- Wooden planks
- Brackets or corner brackets
- Screws and anchors
DIY Steps:
- Measure the corner and cut the plank to fit.
- Attach brackets to the wall and place the plank on top.
- Secure with screws and style with decorative items.
Why It Works:
Corner shelves are space-savers and create a cozy display area without cluttering your walls.

5. Rope Shelves
Rope shelves are trendy, creative, and easy to customize. They bring a nautical or boho vibe to your interiors.
Materials Needed:
- Wooden planks
- Strong rope
- Hooks for the ceiling or wall
DIY Steps:
- Drill holes in the corners of the plank.
- Thread the rope through each corner.
- Hang the shelf from hooks and adjust the length.
Why It Works:
Rope shelves are lightweight and ideal for small decorative items like candles, small plants, or photo frames.

6. Industrial Pipe Shelves
Industrial pipe shelves give a bold and edgy look. They combine metal pipes with wooden planks for a modern loft feel.
Materials Needed:
- Metal pipes and flanges
- Wooden planks
- Screws and anchors
DIY Steps:
- Attach pipe flanges to the wall.
- Connect pipes to the flanges.
- Place the wooden plank on top of the pipes.
Why It Works:
Industrial shelves are sturdy, functional, and perfect for loft apartments, home offices, or kitchens.

7. Minimalist Floating Box Shelves
Box shelves are simple, modern, and functional. They can be mounted horizontally, vertically, or in patterns.
Materials Needed:
- Wooden planks
- Nails or screws
- Wall anchors
DIY Steps:
- Assemble the box by joining four wooden planks.
- Mount the box to the wall using screws and anchors.
- Paint or leave it natural for a minimalist look.
Why It Works:
Box shelves create a neat display area for books, vases, or small artwork.

8. Magnetic Wall Shelves
Magnetic shelves are creative and fun for displaying lightweight items. They are ideal for offices, kitchens, or kids’ rooms.
Materials Needed:
- Magnetic strips or magnetic boards
- Small metal containers or clips
- Screws or adhesives
DIY Steps:
- Attach the magnetic strip to the wall.
- Add metal containers or clips to hold items.
- Customize with colors or decorative magnets.
Why It Works:
Magnetic shelves keep small essentials organized while adding a modern twist to your space.

9. Pegboard Wall Shelves
Pegboards are incredibly versatile and customizable. You can adjust the shelf positions anytime.
Materials Needed:
- Pegboard
- Peg hooks and shelf brackets
- Screws and wall anchors
DIY Steps:
- Mount the pegboard on the wall.
- Insert hooks and brackets where needed.
- Place shelves or hang items according to your preference.
Why It Works:
Pegboards are functional, perfect for organizing tools, craft supplies, or kitchen utensils.

10. Branch Wall Shelves
Bring a touch of nature indoors by using real tree branches as shelves. It’s rustic, eco-friendly, and artistic.
Materials Needed:
- Clean, sturdy branches
- Sandpaper
- Wall brackets or rope
- Screws
DIY Steps:
- Clean and sand the branch for smooth edges.
- Attach the branch to the wall using brackets or rope.
- Place light items like candles, small plants, or decor pieces.
Why It Works:
Branch shelves are unique and add an organic, natural vibe to your home.

Conclusion
DIY wall shelves are a simple way to enhance your space, combine functionality with aesthetics, and showcase creativity. From modern floating shelves to rustic branch designs, there are endless possibilities to match your style. These 10 DIY wall shelf ideas simple are budget-friendly, easy to make, and perfect for any room in your home.
Start small, experiment with materials, and transform your walls into an organized, stylish space today.

Leave a Reply